
Growing microgreens is a great way to have a steady supply of fresh herbs and miniature vegetables for your meals. Here’s a guide to help you get your garden up and running.
So, what’s a microgreen? How do you start growing microgreens? What can you do with microgreens once you’ve grown them? These are just some of the burning questions we’re going to answer for you in this guide.
What Are Microgreens?
You may have seen or eaten microgreens and not known it. They are popular with chefs across the country, and farmers’ markets and organic grocery stores now carry them.
Microgreens are just miniature versions of herbs, vegetables, and other types of greens. Some people call microgreens “vegetable confetti.” They are immature greens that you harvest when the plants are about 2 inches tall. The entire plant is edible at this point.
Similar to sprouts (think alfalfa sprouts), they are jam-packed full of nutrients in a concentrated source and also contain enzymes that are beneficial to your health.
In fact, microgreens have up to 40 times the nutritional impact that fully grown vegetables do. For example, red cabbage microgreens have 40 times more vitamin E and six times more vitamin C than the mature red cabbage. So, you can see the benefit of growing your own and consuming them.
But unlike sprouts, microgreens aren’t prone to bacteria growth because they grow in an open-air environment. And, you only eat the stem and leaves of microgreens, not the root and seed. They make for a great replacement in salads and garnish main dishes. Some people even make microgreen salads.
You don’t need a lot of expensive equipment. As long as you have a shallow container, a sunny location, potting soil, and seeds, you can start growing vegetable confetti in no time.
What Are the Different Types of Microgreens?
Almost any type of vegetable can be a microgreen. But the most common variety of vegetables and flowers are lettuce, kale, spinach, radish, beet, greens, watercress, cabbage, chia, herbs, and sunflowers.
How to Grow Microgreens
Because of their gourmet reputation, microgreens are expensive to buy in stores. But you’ll be happy to know that growing microgreens is easy. There are a few things you’ll need. If you don’t have them already, you can buy most of the supplies at any garden center or online stores such as Amazon.
If you want an indoor microgreen garden, you’ll need a shallow dish, soil, seeds for the vegetables listed above (or microgreen seeds), a spray bottle, and sharp scissors.
If you don’t have a south-facing window, you may need a grow light to help things along. And if you want to grow your microgreens on your counter, then a grow light is mandatory. Luckily, they are inexpensive.
If it’s spring or summer, you can grow microgreens outside. Just be sure to bring them in when colder weather sets in. If it’s fall or winter, you may want to get a warming mat to help the germination process for your indoor garden.
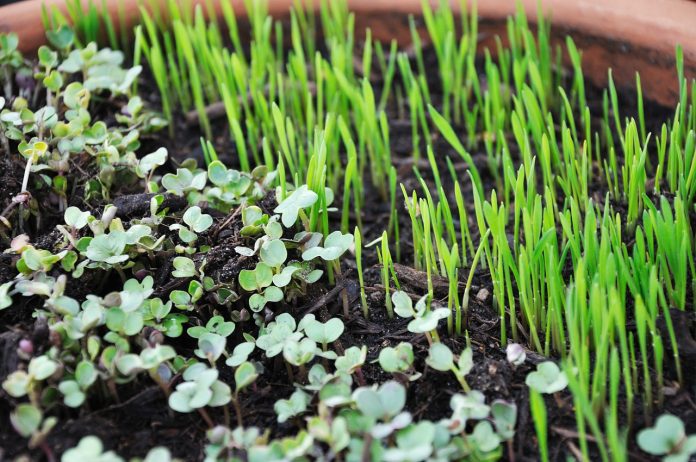
Put about an inch of soil in your container and smooth it out evenly. Sprinkle your seeds over the soil. Be generous in the number of seeds you sprinkle, because they will only get to be 1 or 2 inches tall. So, you’ll need more so you can harvest as many as possible from the tray.
If you want to speed up the sprouting process, you can soak the seeds overnight. However, the seeds will be harder to sprinkle evenly over the surface.
After you have sprinkled your seeds, cover them with a little bit of soil, and spray the soil with clean, filtered water. Any spray bottle will do. You’ll want to keep the soil damp, so spraying it a few times a day is necessary.
After about 2 to 4 weeks, you’ll be able to harvest your microgreens. You can cut them with scissors, right above the soil. Rinse them, then add them to salads or turn them into garnishes for your main dishes.
How to Store and Keep Microgreens
For optimal nutrition, it’s best to wait to harvest them until right before you’re going to eat them. But because that’s not always possible, there are a few things you can do to maintain freshness.
As with many veggies, maintaining proper moisture levels is key to keeping them fresh. After rinsing the harvested microgreens, be sure to pat them dry to remove any excess moisture. Then, wrap the microgreens in damp paper towels and seal in a plastic bag or container. They should stay fresh for about a week.
Maintaining a cool temperature and keeping microgreens out of sunlight once harvested will also help maintain their freshness. Sunlight can change the taste of some microgreens if they’re exposed to it after harvesting.
We do not recommend freezing microgreens, because they can lose up to 40% to 60% of their nutritional value. But you can dehydrate them, which results in a nutrient loss of only 3% to 5%. If you do dehydrate your microgreens, try grinding them into a powder and keeping it on hand for smoothies.
If your microgreens start to look a little shriveled, they are about to go bad. You can still eat them, but they won’t have the same nutritional value or taste. If you notice any bad smell, then your microgreens are past saving and should be thrown away or put into your compost pile.
Microgreens for Farmers
If you’re a farmer who needs to add some revenue to your operations, you should try growing microgreens. Let’s break down how growing microgreens might benefit your bottom line.
First, the fixed costs associated with growing microgreens is low. The shallow trays you’ll need only cost about $1 per unit when you buy them in bulk.
The variable costs are seeds, soil, labor, and water. Seeds will cost less than $15 per pound, and the soil will cost about $1 per tray. All total, each tray should cost about $2 to $4. Not bad!
But what about their crop yields? Each tray produces about 8 to 12 ounces of microgreens, unless you’re growing bigger shoots such as sunflowers. Those can yield about 12 to 18 ounces per tray.
So what should you charge? It depends on the price of the seeds, but for the most part, charging $3 per ounce will net you a nice profit.
Try selling to restaurants, local farmers’ markets, and local organic grocers. They are all good places to start. Or, if you have your own farmer’s market, you can make a nice profit selling your brand of microgreens.
Recipes for Microgreens
So now you have a crop of microgreens. What should you make with them? Here are a few ideas. Note that most of these recipes are super healthy, so if you’re trying to add more nutritious foods to your diet, these are perfect.
Keep in mind that microgreens have a more intense taste than their fully-grown counterparts, so stick to ones that you enjoy the most.
Salads and Condiments
You can make a salad entirely out of microgreens and some romaine lettuce. Throw in some radishes and roasted chickpeas, and make a dressing out of lime juice, mustard powder, salt, and olive oil.
Another yummy salad involves arugula microgreens, berries, red corn, pine nuts, white asparagus and a dressing made out of olive oil, red wine vinegar, mint, garlic, chopped caper berries, and salt.
Try this take on pesto by using microgreens instead of fully-grown basil. It’s so good!
Main Dishes and Desserts
Here are some ideas for main dishes and desserts:
- Add microgreens to an egg white, avocado, and goat cheese omelet for a special breakfast or brunch. Or sprinkle microgreens over hash browns, eggs, and bacon for some added nutrition.
- Try making these vegetarian tacos with microgreens and avocado cream. It only takes 5 minutes to make these mouth-watering tacos that even non-vegetarians will enjoy.
- Top these salmon burgers with microgreens for a meal full of superfoods.
- These roasted root vegetable fajitas are a great way to try using microgreens as your topping rather than shredded lettuce or slaw.
- Have a craving for pizza? Make your own parmesan and ricotta cheese pizza and top it with microgreens. The addition of pistachios and bacon will make your mouth water.
- Add some microgreens to a beef burger and top it with feta and mint aioli. Yum!
- This garlic and lemon pasta with arugula microgreens is a great summer dish.
- Who doesn’t like grilled cheese? This ham and brie grilled cheese with microgreens, apple, and dijon mustard is mouthwatering.
- Bet you weren’t expecting a dessert in this list, but this strawberry chocolate tart topped with basil microgreens is fantastic!
Smoothies
Get your day off to a good start and keep your immune system humming with a green smoothie. Here are three recipes we found that sound delicious.
The Green Dream smoothie uses grapefruit juice, aloe vera juice, an apple, plain or vanilla yogurt, and microgreens. The Temple Tonic uses orange juice, coconut water, bananas, yogurt, and microgreens. And the Cure-All uses beet-top microgreens, pea shoots, oregano, radish microgreens, a frozen banana, mango, orange juice, yogurt, and honey.
Conclusion
In this guide, we covered what microgreens are, what goes into growing microgreens, how you can make a profit selling microgreens, and some recipes to try. We hope that you will take this information and start your very own microgreen garden. Here’s to your health and well-being!


